Just google it and find bunch of similar answers, but restarting AppPool worked for me.
آذر ۲۹، ۱۳۹۰
آذر ۲۵، ۱۳۹۰
حل کردن مشکل مخفی شدن فایل های فلش توشط ویروس
یک فایل متنی درست کنید و دستورهای زیر رو تو اون فایل کپی-پیست کنید و بعد با پسوند bat ذخیرش کنید:
ECHO Type the drive letter. ONLY the letter.

ECHO ALL FILES ARE GOING TO BE MODIFIED!!!

set /p letter=


ECHO %letter%: selected

taskkill /im explorer.exe /f

ECHO.

ECHO "Modifying files..."

ECHO.


attrib -s -h -a /s /d %letter%:\*.*


ECHO "Process completed."


start explorer %letter%:

taskkill /im cmd.exe /f
حالا اجراش کنید، و اسم درایو فلشتون رو به همراه دو نقطه وارد کنید و اینتر رو بزنید، همه چی درست میشه!
آبان ۲۳، ۱۳۹۰
Fix error "Failed to generate a user instance of SQL Server due to a failure in starting the process for the user instance."
"Failed to generate a user instance of SQL Server due to a failure in starting the process for the user instance. The connection will be closed."
If you did and tried to find how to resolve this you probably Googled (or Binged) for hours without being able to find the solution that really works.
Well lets put an end to that. Two simple things need to be done:
Step 1. Enabling User Instances on your SQL Server installation
First we are gonna make sure we have enabled User Instances for SQL Server installation.
Go to Query Window in SQL Server Management Studio and type this:
exec sp_configure 'user instances enabled', 1.

Go

Reconfigure
Run this query and then restart the SQL Server.
Step 2. Deleting old files
Now we need to delete any old User Instances.
Go to your C drive and find and completely DELETE this path (and all files inside):
C:\Documents and Settings\YOUR_USERNAME\Local Settings\Application Data\Microsoft\Microsoft SQL Server Data\SQLEXPRESS
(Dont forget to replace the green text in the path with your current username (if you are not sure just go to C:\Documents and Settings\ path to figure it out).
Step 3.
- R
un the Internet Information Services (IIS) Manager tool. This tool can be accessed either from the Administrative start menu, or by typing "inetmgr" in the Windows Start-->Search textbox and selecting the inetmgr tool. - In the left-hand pane of the IIS Manager tool expand the machine node.
- Click on the "Application Pools" node so that the application pools display in the main window of the management tool.
- If you are troubleshooting an ASP.NET 2.0/3.0/3.5 application select the "DefaultAppPool" application pool. For ASP.NET v4 select the "ASP.NET v4.0" application pool.
- Right-click on the selected application pool and choose "Advanced Settings"
- In the "Advanced Settings" dialog box find the category called "Process Model". The first row in the category will be the "Identity" row.
- Click on the "Identity" row and then click on the small button that shows on the right-hand side of the value cell. The button displays the text "…"
- A dialog box called "Application Pool Identity" will popup. Within that dialog box there are two radio buttons. Make sure the first radio button titled "Built-in Account" is selected.
- In the dropdown box below the radio button choose "Network Service" for the identity.
- Click "Ok" to close out the "Application Pool Identity" dialog box.
- Click "Ok" to close out the "Advanced Settings" dialog box.
- At this point the changes to the application pool identity will have been saved to IIS 7.5's configuration store.
آبان ۱۱، ۱۳۹۰
Installing OpenCV 2.3.0 in Windows with VisualStudio 2010
Download OpenCV source: http://sourceforge.net/projects/opencvlibrary/files/opencv-win/2.3/OpenCV-2.3.0-win-superpack.exe/download
Extract “opencv” folder to fiels to C:\cv
Download and install CMake
Start the CMake GUI from Start menu
Select:
•Where is the source code: (the directory where CMakeLists.txt in OpenCV is stored), eg: "C:\Program Files\OpenCV2.2"
•Where to build the binaries: (the directory where the OpenCV library will be built), eg: "C:\Program Files\OpenCV2.2\build"
•Add these two entries:
oUSE_FFMPEG with value 1
oWITH_CUDA with value 0
Press Configure and select Visual Studio 2008 or 2010 project.
Enter any parameters, like if you want to build Python bindings, documentation, shared libraries, use TBB, CUDA, Eigen2 libraries, etc. (Note that TBB, 64-bit and CUDA may still be under development and therefore buggy)
Repeat pressing Configure until no more red rows are highlighted.
When ready, press Generate.
Open the "build" directory, where you will find your VS2008 or VS2010 "sln" file.
Open the sln file in VS2008 or VS2010, and Built the Solution. This should compile the OpenCV 2.2 library into the build folder.
WALK THROUGH FOLDERS YOU SHOULD INCLUDE IN VS AND REPLACE THEIR FILES WITH CURRENT BUILT FILES.
Building your own projects using OpenCV 2.2 in Visual Studio
After you have compiled the OpenCV 2.2 library using CMake, you should configure your Visual Studio projects to use OpenCV.
For the below instructions its assume that you installed OpenCV to the default location C:\OpenCV2.2 - if you selected something different (e.g. C:\Program Files\OpenCV2.2) then please adjust accordingly.
First of all create your new (full or empty) C/C++ project.
For an application project (*.exe) add this to your project properties:
Go to VC++ Directories
Add 2 new Include Directories (it's the path where you installed OpenCV, include folder):
C:\Program Files\OpenCV2.2\include
C:\Program Files\OpenCV2.2\include\opencv
Add 1 new Library Directory (it's the path where you installed OpenCV, lib folder):
C:\Program Files\OpenCV2.2\lib
Go to Linker in the left menu and select Input option
Add these entries on Additional Dependencies option:
C:\Program Files\OpenCV2.2\lib\opencv_core220d.lib
C:\Program Files\OpenCV2.2\lib\opencv_highgui220d.lib
C:\Program Files\OpenCV2.2\lib\opencv_video220d.lib
C:\Program Files\OpenCV2.2\lib\opencv_ml220d.lib
C:\Program Files\OpenCV2.2\lib\opencv_legacy220d.lib
C:\Program Files\OpenCV2.2\lib\opencv_imgproc220d.lib
Make the content of 'OpenCV_Helloworld.cpp' as such:
For a shared dynamically loadable library project (DLLs) add this to your project properties:
C/C++ - General - Additional include Directories:
C:\OpenCV2.2\include\opencv;C:\OpenCV2.2\include
Linker - General - Additional library Directories:
C:\OpenCV2.2\lib
Linker - Input - Additonal Dependencies (debug):
opencv_core220d.lib opencv_highgui220d.lib opencv_video220d.lib opencv_ml220d.lib opencv_legacy220d.lib opencv_imgproc220d.lib
Linker - Input - Additonal Dependencies (release):
opencv_core220.lib opencv_highgui220.lib opencv_video220.lib opencv_ml220.lib opencv_legacy220.lib opencv_imgproc220.lib
// OpenCV_Helloworld.cpp : Defines the entry point for the console application.

// Created for build/install tutorial, Microsoft Visual Studio and OpenCV 2.2.0


#include "stdafx.h"

#include <cv.h>

#include <cxcore.h>

#include <highgui.h>


int _tmain(int argc, _TCHAR* argv[])

{

        // Open the file.

        IplImage *img = cvLoadImage("photo.jpg");

        if (!img) {

                printf("Error: Couldn't open the image file.\n");

                return 1;

        }

        // Display the image.

        cvNamedWindow("Image:", CV_WINDOW_AUTOSIZE);

        cvShowImage("Image:", img);

        // Wait for the user to press a key in the GUI window.

        cvWaitKey(0);

        // Free the resources.

        cvDestroyWindow("Image:");

        cvReleaseImage(&img);


        return 0;

}
Click on "Debug -> Build Solution" or "Release -> Build Solution" to compile your project. If there was a compile error then you did not set the header file includes correctly. If there was a linker error then you did not set the library path or lib files correctly.
If you get the message as ' 'msvcv100d.dll' ' or ' 'msvcr100d.dll' ' cannot be loaded then download these two dlls(search on google) and copy them to 'bin' folder.
Copy any JPG image as 'photo.jpg' to 'My Documents\Visual Studio 2010\Projects\OpenCV_Helloworld\OpenCV_Helloworld', or to wherever you saved the project to.
Click on "Debug -> Start Debugging" or "Debug -> Start without Debugger".
You should now see an OpenCV GUI window with the photo inside. If an error window pops up about DLL files then make sure you compiled the OpenCV library using CMake (above) and have the OpenCV DLL files on your system PATH or in the same folder as the EXE of your project. If the program runs but it says it cant find the image file, then make sure your image is in the same folder as the EXE, and that it is named 'photo.jpg'.
REF:
http://opencv.willowgarage.com/wiki/VisualC%2B%2B
http://opencv.willowgarage.com/wiki/InstallGuide
OpenCV 2.3.0 Binary for Windows (with ffmpeg support) : http://www.mediafire.com/?cxqtzea2uxd1cfk
مهر ۰۶، ۱۳۹۰
Need For Speed: Hot Pursuit language problem
Open Registry Editor.
Type regedit in start menu run or search box.
Locate the following key: HKEY_LOCAL_MACHINE\SOFTWARE\Wow6432Node\Electronic Arts\Need for Speed(TM) Hot Pursuit\1.0 (on 64-bit systems) OR HKEY_LOCAL_MACHINE\SOFTWARE\Electronic Arts\Need for Speed(TM) Hot Pursuit\1.0 (on 32-bit systems) Change the Language key value to ‘English’ and Locale key value to ‘en_US’.
Check installation directory and look for en_US folder, if it does not exist, download from here and extract it to the installation path.
تیر ۲۶، ۱۳۹۰
System.Web.Security.SqlMembershipProvider' requires a database schema compatible with schema version '1'
اگه از راه حل هایی که با گوگل کردن پیدا کردید حل نشد، این کار احمقانه رو بکنید:
به یه دیتابیس دیگه تو سرور وصل بشید و یه سری اطلاعات ازش بخونید (هرچی). بعد حل میشه.
خرداد ۱۷، ۱۳۹۰
login failed error for IIS APPPOOL\DefaultAppPool
ممکنه موقع کار با SQL Server و ASP.net به این پیغام خطا بر بخورید:
Login failed for user 'IIS APPPOOL\DefaultAppPool
توی Internet Information service روی وب سایتی که این مشکل رو داره راست کلیک کنید و برید به Manage Web Site -> Advanced Settings و ببینید Application Pool چه مقداری رو داره:

اینجا DefaultAppPool هست مقدارش.
حالا برید IIS root و روی Application Pools کلیلک کنید و مقدار Application poolی که بالا دید رو اینجا هم پیدا کنید (اینجا DefaultAppPool بود). روش راست کلیک کنید و Advanced Settings رو کلیک کنید.
حالا Identity رو پیدا کنید و مقدارش رو به LocalService تغییر بدید.

SQL Server 2005 Installation Error: "Failed to find the ASP.Net Version Registration with Microsoft Internet Information Services (IIS)"
این هشدار معمولا وقتی که میخواید SQL Server 2005 رو روی ویندوز 64بیتی نصب کنید دیده میشه، برای برطرف کردنش این کار ها رو به ترتیب انجام بدید:
برید به Control Panel>Programs (or Programs and Features)>Turn Windows features on or off و تمام آیتم هایی که دوزشون خط قرمز کشیده شده رو تیک بزنید.

حالا OK رو کلیک کنید و منتظر بمونید تا کارش تموم بشه.
یک command prompt با سطح دسترسی مدیر باز کنید و این دستور رو اجرا کنید:
cscript %SYSTEMDRIVE%\inetpub\adminscripts\adsutil.vbs SET W3SVC/AppPools/Enable32bitAppOnWin64 1و بعدش این یکی رو:
%SYSTEMROOT%\Microsoft.NET\Framework\v2.0.50727\aspnet_regiis.exe -iحالا میتونید SQL Server رو نصب کنید بدون اون هشدار.
بهمن ۲۲، ۱۳۸۹
نصب Mac OS X روی VirtualBox و ارتقا به نسخه 10.6.6
شاید شما هم جزو اون هایی هستید که خیلی دلشون میخواد واسه یه بار هم که شده Mac OS X رو امتحان کنن، اگه هستید کار خیلی سختی نیست انجام دادنش.
برای این کار (تو ویندوز) باید رم کامپیوترتون اونقدری باشه که حد اقل 1GB به OS X بدید تا خیلی موقع کار باهاش اذیت نشید. حدود 10GB هم فضای خالی روی هارد دیسک لازم دارید. همینطور آخرین نسخه از VirtualBox رو که اون رو هم میتونید از اینجا تهیه کنید.
مرحله اول تهیه DVD یا فایل iso از OS X هستش، فایل iso رو میتوینید از torrent بگیرید، حدود 5GB حجمشه. از اینجا . لینکی که دادم لینک یه جستجو تو گوگله، میتونید سایت مناسب رو انتخاب کنید و فایل رو دانلود کنید.
مرحله بعد نصب کردن VirtualBox. بعد از این، باید یه Virtual machine جدید برای نصب کردن OS X بسازید.
1) VirtualBox رو باز کنید و دکمه New رو کلیک کنید

2) Virtual machine رو اسمش رو بذارید"OSX" و نوع سیستم عامل رو "Mac OS X" انتخاب کنید. نسخه اون رو هم "Mac OS X Server" انتخاب کنید. توجه داشته باشید که ممکنه تو نسخه جدید برنامه، نسخه 64 بیتی هم وجود داشته باشه، ولی شما نباید اون رو انخاب کنید.

3) باید به VM مقداری RAM اختصاص بدید. اینجا من 1.5GB اختصاص دادم.
4) حالا باید برای ماشین مجازیمون یه هارد دیسک تعریف کنیم، مقدارش بستگی به نیازمون داره. اینجا 20GB به صورت داینامیک تعریف میکنیم، البته استاتیک هم میتونیم استفاده کنیم، ولی حسن داینامیک اینه که هرچقدر از این 20GB که پر بشه رو بعدش از فضای هارد خودتون استفاده میکنه، همون اول کار 20GB از هارد شما رو استفاده نمیکنه.

5) حالا از "Settings" گزینه "System" رو انتخاب کنید و چک مارک "Enable EFI (special OSes only)" رو بردارید، مثل شکل.

6) حالا "Storage" رو انتخاب کنید، بعد "Empty" رو که پایین OSX.vdi قرار داره انتخاب کنید، حالا روی آیکن پوشه با یه فلش سبز رو کلیک کنید.

7) توی پنجره ای که باز شده، روی "Add" کلیک کنید (آیکن سه تا سی دی که روش یه + هست)، بعد فایل iso مک رو که روی هاردتون هست رو انتخاب کنید و انتخابش کنید و بعد "Select" رو بزنید. حالا "Ok" رو بزنید و بعد هم تو پنجره اصلی VB دکمه "Start" رو بزنید.

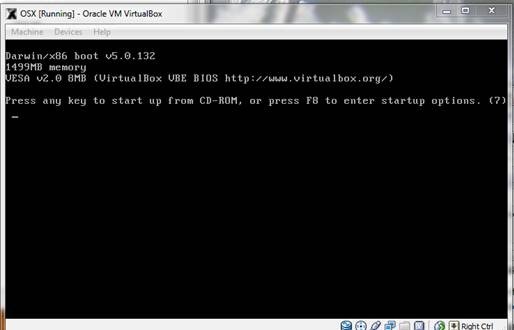
8) حالا برای شروع نصب یک دکمه رو فشار بدید، همون طوری که installer گفته.
9) حالا زبان رو انتخاب کنید و به مرحله بعد برید و تو مرحله بعد "Continue and Agree" رو کلیک کنید.

10) تو این مرحله باید پارتیشن نصب OS X رو آماده کنید. روی Utilities کلیک کنید و Disk Utility رو انتخاب کنید.

11)حالا 20GB VBOX HARDDISK رو انتخاب کنید و Erase رو از سمت راست انتخاب کنید و هر اسمی رو که دوست دارید برای پارتیشن انتخاب کنید. حالا دکمه "Erase..." رو کلیک کنید.
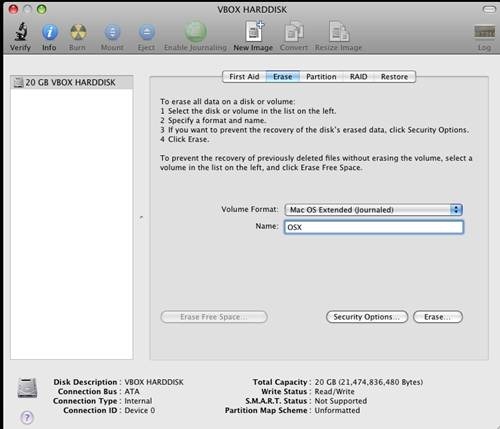
وقتی که عملیات تموم شد از Disk Utility خارج بشید، دوباره به Installer برمیگردید.
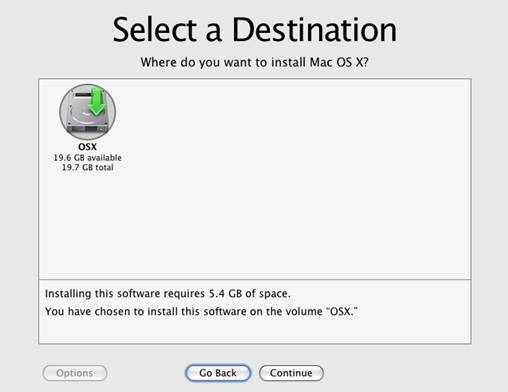
12)حالا درایوی رو که نشون داده شده انتخاب کنید و Continue رو بزنید.
13) حالا دکمه Customize رو بزنید و این ها رو انتخاب کنید:
- به روز ترین نسخه رو انتخاب کنیدف اینجا باید MAC_OS_X_10.6.4 باشه
- Bootloaders_Intel_Only رو باز کنید و جدیدترین Chameleon رو انتخاب کنید
- Kernels رو باز کنید و Legacy Kernel رو انتخاب کنید.
اگه از CPUی Intel استفاده میکنید AMD رو تیک بزنید.

14) Done رو کلیک کنید و بعدش برای شروع نصب Install رو بزنید.
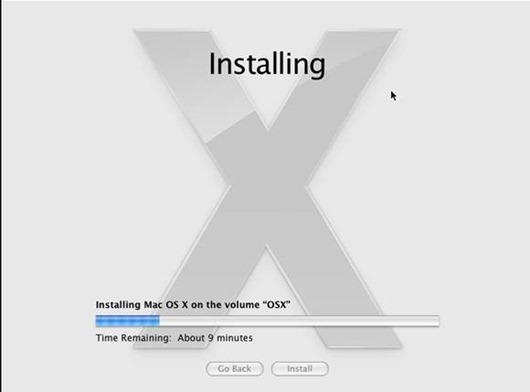
15) بعد از تموم شدن نصب، شمارش معکوس برای restart کردن کامپیوتر شروع میشه، قبل از تموم شدن شمارش Crtl راست را فشار بدید تا موس از پنجره نصب آزاد بشه، بعد بالای پنجره Devices رو کلیک کنید و CD/DVD Devices رو انتخاب کنید و Unmount CD/DVD Devices رو کلیک کنید. حالا از منوی Machine گزینه Restart رو انتخاب کنید تا ماشین دوباره راه اندازی بشه.
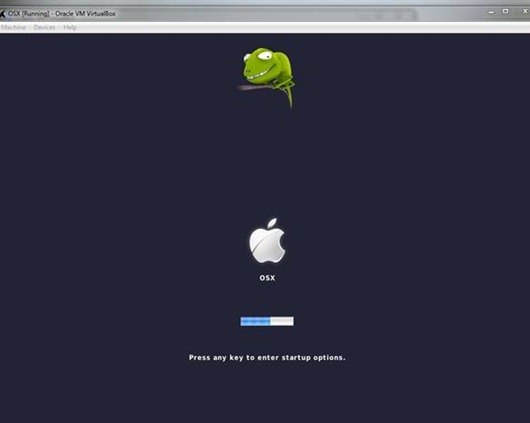
16) بعدش شما Chameleon bootloader رو میبینید و بعدش به OS X وارد میشید!
ارتقا به نسخه 10.6.4
قبل از شروع ارتقا آخرین نسخه Kernel رو باید نصب کنید. میتونید از اینجا بارگیری کنیدش. بعد از نصب OS X رو RESTART نکنید. حالا فایل به روز رسانی رو میتونید از اینجا بگیرید http://support.apple.com/kb/DL1349 و نصبش کنید.
اشتراک گذاری فایل بین OS X و Windows به واسطه VirtualBox
برای اینکار توی میزکار Go رو کلیک کنید و Connect to Server... رو انتخاب کنید.

حالا این آدرس رو وارد کنید: smb:// 192.168.56.1 (آدرس میزبان ویندوز)

تمام صفحه کردن پنجره OS X در VirtualBox
به پوشه ای که VirtualBox رو نصب کردید برید، دکمه Shift رو نگه دارید و Open command window here رو باز کنید. این دستور رو اجرا کنید:
VBoxManage setextradata "OSX" "CustomVideoMode1" "1336x786x32"
بهمن ۰۸، ۱۳۸۹
Winodws Live Mesh Error: Sorry there was a problem with Windows Live Mesh

ممکنه بعد از نصب Live Mesh این مشکل براتون پیش بیاد، احتمالا برای کسایی که محصولات Adobe رو نصب کردند و بعدش هم کرک کردند حتما پیش میاد. برای رفع کردنش برید به C:\Windows\System32\drivers\etc و فایل hosts رو با notepad باز کنید، بگردید دنبال 0.0.0.0 که جلوش نوشته localhost، کاری که باید بکنید اینه که 0.0.0.0 رو تغییر بدید به 127.0.0.1 و فایل رو ذخیره کنید.
بهمن ۰۳، ۱۳۸۹
رفع مشکل آفلاین نشان دادن دوستان در ویندوز لایو مسنجر
من تو ویندوز 7 (64 بیتی) این مشکل رو داشتم که به این صورت حل شد:
اول مسنجر رو ببندید، بعد به این آدرس برید %userprofile%\appdata\local\microsoft\ ، بعد اسم پوشه Windows Live رو تغییر بدید و آخر کار، دوباره مسنجر رو باز کنید.
اشتراک در:
پستها (Atom)